How to Create Product Photos with AI
Turn a basic product snapshot into an ecommerce-ready image with a repeatable workflow for cleanup, composition, relighting, background generation, quality control, and export.
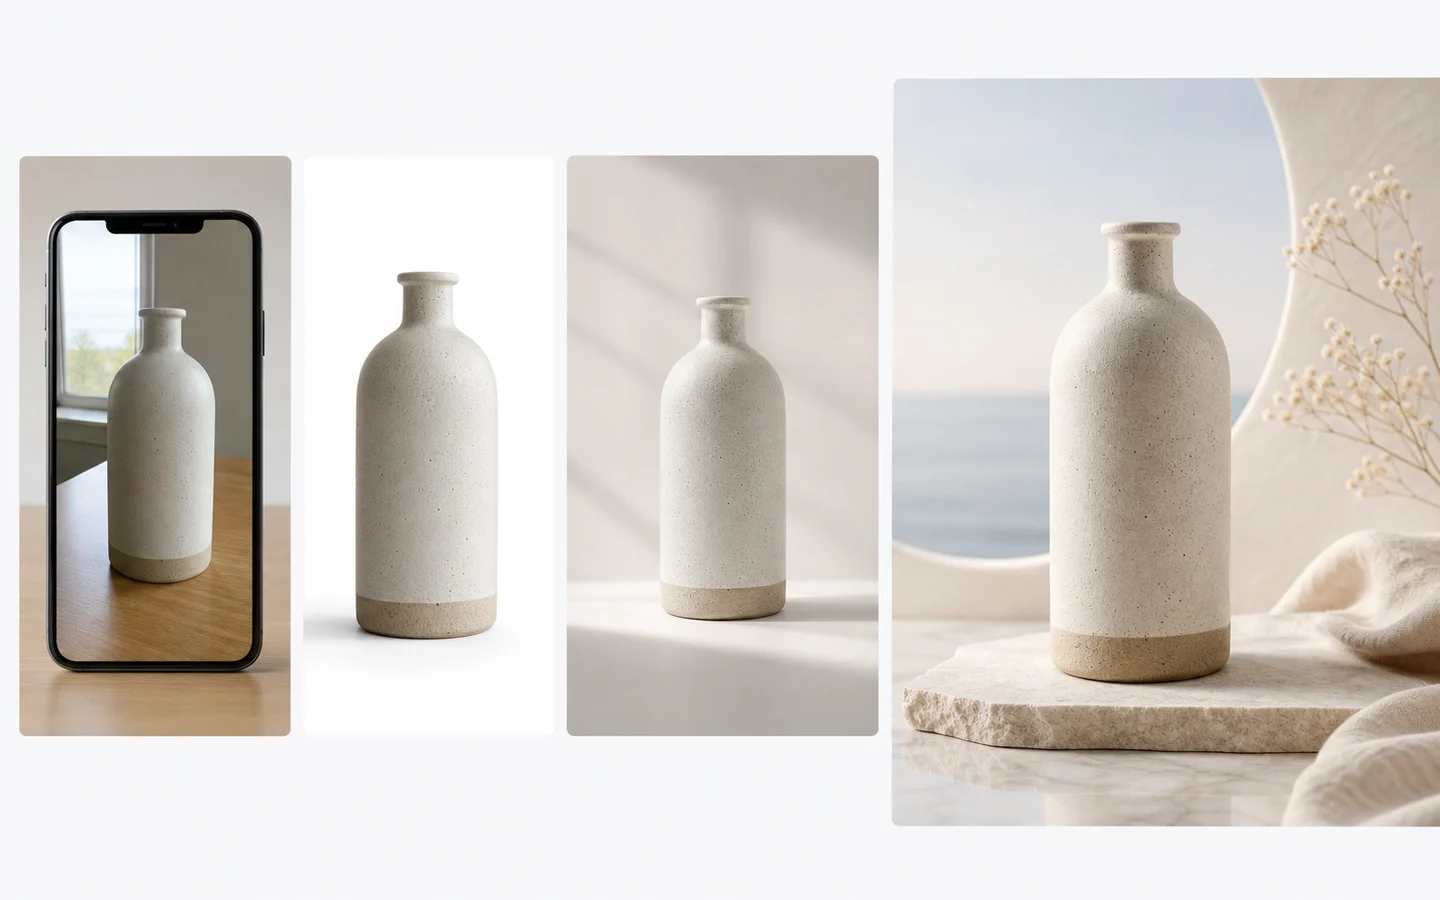
You do not need a large studio to create a useful first set of product images, but you do need a disciplined source photo and review process. AI can replace or improve the background, lighting, surface, and composition. It should not be trusted to silently redefine the product.
The workflow below starts with a real snapshot, turns it into a controlled commercial image, and finishes with checks for ecommerce accuracy.
The short workflow
1. Capture a clean source image. 2. Remove distractions or isolate the product. 3. Define the final placement and ratio. 4. Generate one background and lighting direction. 5. Correct one issue at a time. 6. Inspect product identity at full size. 7. Upscale and export only after approval.
Use the AI Image Editor for direct revisions, Image to Image for broader variations, the Background Remover for source cleanup, and the Image Upscaler for the final delivery file.
Step 1: capture a source image the model can understand
AI works better when the source already explains the product clearly.
- Clean fingerprints, dust, and temporary stickers.
- Use a simple background with visible edge contrast.
- Avoid very wide lenses that distort proportions.
- Keep the entire product in frame with a little margin.
- Use soft, even light instead of hard mixed-color lighting.
- Capture additional angles for your own accuracy checks.
A phone photo near a large window can be enough. The goal is not to create the final mood. It is to record reliable geometry, material, color, and packaging details.
For reflective products, move bright clutter away from the room around the product. Reflections are part of the source and can confuse both background removal and relighting.
Step 2: clean or remove the original background
If the original background contains strong colors, furniture, hands, or complex shadows, start with the Background Remover.
Inspect:
- The edge around glass, metal, hair-like fibers, and thin handles.
- Holes and negative spaces inside the product.
- Whether the natural contact shadow should be preserved or rebuilt.
- Any background color reflected in the product surface.
A clean cutout is useful, but not every product should look perfectly isolated. A subtle contact shadow helps the object feel grounded in the generated scene.
Step 3: decide the final job before writing the prompt
Do not prompt for “a professional product photo” without defining the placement.
Choose:
- Marketplace listing, storefront hero, email banner, or social ad.
- Square, portrait, landscape, or platform-specific ratio.
- Product scale inside the frame.
- Camera angle and crop.
- Amount and position of negative space.
- Plain studio, material surface, or lifestyle environment.
The same product needs different composition for an Amazon-style listing and a homepage banner. The final placement should determine the frame from the beginning.
Step 4: write a controlled first prompt
Separate the desired change from the details that must remain fixed.
Create a clean storefront hero image using the supplied product. Place it on light warm-gray stone against a soft ivory studio background. Front three-quarter view, 70mm product photography, soft key light from upper left, gentle fill, realistic contact shadow, landscape composition with negative space on the right. Preserve the product shape, dimensions, cap, material, color, label area, and camera angle. No extra products, no text, no flowers.This prompt defines scene, camera, light, composition, invariants, and exclusions. Add props only when they explain use or scale. Decorative objects often compete with the product and increase failure points.
Step 5: revise one variable at a time
If the first result is close, do not rewrite the entire brief.
Use targeted revision prompts:
- “Change only the background from ivory to pale sage.”
- “Reduce the contact shadow opacity and keep everything else unchanged.”
- “Move the product slightly lower while preserving its size and camera angle.”
- “Remove the small prop behind the product; do not alter the product.”
- “Make the key light softer without changing the background or crop.”
When you change background, lighting, angle, and props together, a successful detail can be lost in the next version.
Step 6: perform an ecommerce accuracy review
Compare the result with the real product, not with the previous AI output.
Check:
- Overall silhouette and proportions.
- Number, position, and shape of controls.
- Cap, pump, handle, seam, and opening geometry.
- Material finish and color.
- Label boundary and required packaging information.
- Reflections that imply a different shape.
- Duplicated, missing, or melted components.
- Grounding and shadow direction.
Do not use generated packaging text as legal or factual copy. Preserve verified source artwork or add accurate text during design production.
Step 7: create the remaining catalog consistently
Once one image is approved, turn its choices into a reusable production brief.
Record:
- Lens and camera angle.
- Product scale and vertical position.
- Background color or material.
- Key-light direction and softness.
- Shadow treatment.
- Ratio, crop, and export dimensions.
- Negative constraints.
Use the same structure for every SKU. Batch consistency comes from locked decisions, not from adding “same style” to a vague prompt.
If products vary greatly in shape or reflectivity, create a small number of templates instead of forcing every item into one setup.
Step 8: upscale and export
Use the Image Upscaler after the composition and product details are approved.
Then export according to the destination:
- Keep a high-quality master.
- Use sRGB for standard web delivery.
- Compress a separate storefront version.
- Confirm that small thumbnails keep the product recognizable.
- Check the platform’s current background, crop, and file-size requirements.
Do not repeatedly download, recompress, and re-upload the same file. Keep a master and derive delivery versions from it.
Three useful prompt variations
Clean marketplace image
Place the supplied product on a seamless pure white background with a soft realistic contact shadow. Centered front three-quarter view, even commercial lighting, accurate color. Preserve all product geometry and packaging details. No props, no text changes, no reflections from the original room.Storefront hero
Create a premium landscape hero image of the supplied product on pale travertine with a warm neutral gradient background. Soft directional light, subtle edge highlight, generous negative space on the left. Preserve product identity and camera angle. One product only, no text.Lifestyle concept
Place the supplied product in a bright modern bathroom on a dry stone shelf near soft morning window light. Keep the product large, unobstructed, and geometrically unchanged. Background softly out of focus, restrained props, realistic contact shadow, no text changes.Final recommendation
Treat AI product photography as a controlled editing pipeline. Begin with a truthful source, make one art-direction decision at a time, and review the result like a customer or catalog manager would.
Open the AI Image Editor with one clean product photo, create a single approved hero image, and document the settings before scaling the workflow.